Thursday, January 21, 2010

Gluten Free Pizza Crust

In a moment of weakness I bought a package of gluten free pizza crust mix to the tune of $6.99. Ugh. It was good, but I just kept thinking, "I could have made this myself." So after several attempts, I've come up with a winning combination. I plan to make the prebaked crusts in bulk for the freezer so that pizza can be at our fingertips.
(As you can see we are still dairy free at this point. But, believe it or not, we're enjoying pizza just the same.)


Prep Time: 5 minutes
Cook Time: 25 minutes
Yields: 3 large round crusts
Costs: Approx. $3.00

3 Tbsp dry yeast
2 cups brown rice flour ($.75)
1 1/2 cups tapioca flour ($.75)
3 tsp xantham gum
2 tsp salt
3 tsp unflavored gelatin ($.25)
3 tsp Italian seasoning
1 tsp garlic powder
2 cups warm water (approx. 11o degrees)
2 tsp agave nectar
3 tsp olive oil
3 tsp vinegar

Preheat oven to 425 degrees. Blend all ingredients in an electric mixer for 3 minutes with regular beater attachments. Dough should be soft and sticky.


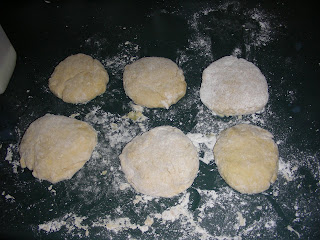
Divide dough into three parts. Place dough in the middle of a pizza stone. (I found that the stone worked best in cooking the dough all the way through and alleviating some of the heaviness that comes with gluten free grains.) Using parchment paper sprayed with cooking oil roll dough to fit the stone. (This will save you a lot of frustration and time in trying to get this sticky dough to conform.)

Bake crust for 10 minutes. Remove and top as desired. Return to oven and bake for an additional 15-20 minutes.

Thursday, January 7, 2010

Roasted Banana Coconut Milk Ice Cream

We normally have a freezer stocked up with ice cream. It's our go-to dessert and we love it in all flavors! Since the elimination diet began we quickly discovered that all natural, dairy free ice cream does exist, but it is WAY expensive. The kind that we are allowed is actually $6.00 per pint. That's crazy! So you can imagine my delight when Saralyn pointed me to the Nourishing Gourmet and the many recipes there for coconut milk ice cream. Here's my adaptation of one of her recipes:

Roasted Banana Coconut Milk Ice Cream

Prep Time: 5 minutes
Cook Time: 20 minutes
Churning Time: 20-30 minutes
Cost: approx. $5.00
Yields: 1 quart


4 bananas cut into chunks ($.50)
2 Tbsp melted coconut oil
6 Tbsp pure maple syrup ($.50)
3 cans of coconut milk (full fat) ($4.00)
2 tsp pure vanilla
1/3 cup water
1 package of gelatin ($.25)
cinnamon

Toss cut bananas in oil and syrup. Place in greased glass dish and bake at 400 for 20-25 minutes or until bananas begin to turn golden in color.

Blend bananas/syrup, coconut milk, vanilla and cinnamon (to taste) in a blender until smooth. Meanwhile boil 1/3 cup of water. Remove from heat and add gelatin. Stir until dissolved. Add gelatin mixture to blender and incorporate well.

Place ice cream mixture to cool in fridge. When cooled process in ice cream maker.

Eat immediately for soft serve or freeze and enjoy later.

**Be warned that the coconut flavor is prominent. The bananas are helpful to bring this into balance, but I think that chocolate would do this even better. To accommodate for the taste, we topped our ice cream with just a tiny bit of maple syrup before serving.**

This recipe and many others are featured in The Grocery Cart Challenge Recipe Swap!

Monday, January 4, 2010

Gluten Free Muffin Mix

Entering the world of gluten free baking is honestly quite frustrating. The grains are expensive and the results unpredictable. There's nothing worse than spending a half and hour and $5 to make a loaf of bread that comes out of the oven like a door stop. Through trial and error and the adaptations of several recipes I've come up with an allergy free muffin recipe that works every time. The best part is that you can store it as a dry mix and make as many or as few as you wish at a time. Enjoy!!

Gluten Free Muffin Mix

1 1/4 cup oat flour
1 cup rice flour
1/2 cup tapioca flour
2 tsp baking soda
1/2 tsp salt
1 tsp xantham gum

Mix well and store in an air tight container.

To make muffins 12 muffins:

To 2 cups of mix add 1/2 cup applesauce or pumpkin puree, 1 tsp vanilla, 1 cup rice milk, 4 Tbps oil, 1/4-1/2 cup agave nectar, 1 tsp cinnamon. Mix well until all ingredients are well incorporated. Add additional milk as needed (the flour will soak up moisture quickly) and more agave nectar to taste.

Place in greased muffin tins. Bake at 375 for 12-15 minutes.


Tips:

-I trippled the mix recipe and was able to make over 5 dozen muffins.
-If adding fruit, place on top of muffin before baking instead of mixing it in. Mixing it in seems to affect how well the muffins rise.
-Brush the tops of muffin with maple syrup after baking for added flavor and sweetness.

Wednesday, December 16, 2009

Homemade "No"mato Sauce

If you read at my other blog you'll know that our family is an adventure in cuisine- The Elimation Diet. We are searching for some answers and are eliminating 11 food allergen groups from our diet for a while. Sure, we miss the sugar and flour and dairy. What we really miss, though, is sauce- tomato sauce. There is a Nomato sauce out on the market, but the amount I would need for one meal would cost a small fortune. So after some research, I've come up with my own version. We've already enjoyed it in chili. Seriously, it really tastes like tomatoes.

Prep Time: 10 minutes
Cook Time: 15 minutes
Cost: Approx. $11
Yield: 12-15 cups

1/2 cup olive oil
3 onions finely diced ($.25)
3 Tbsp minced garlic
juice of one lemon
3 Tbsp balsamic vineager
6 cups pureed pumpkin/squash ($6)
3 cups pureed canned beets ($1.50)
3 tsp coarse salt
3-6 cups chicken broth ($3)

Saute onions and garlic in olive oil until translucent. Add lemon juice and vinegar. Cook for 5 minutes.

Puree beets and squash.


Add puree to onion mixture. Mix in broth and salt until desired texture is reached. Heat through.

I kept my sauce a little thick and froze it in 3 cup portions. Once thawed, I'll just add more chicken broth as needed.

We are so looking forward to more chili and some spaghetti in the coming weeks!

**Since I no longer have any pumpkin puree left, I scoured the stores looking for canned pumpkin. It is nowhere to be found and no one knows when there will be more. Perhaps the pumpkin shortage wasn't and urban myth. Has anyone else had this problem?**

Thursday, November 19, 2009

Thanksgiving Noodles

We almost had a noodle scare. My mom spoke of not making noodles this year and the men about rose up in rebellion. "What! You can't do this to us!!"

She relented and will be, once again, blessing the family with at large pot of perfection this Thanksgiving. I thought I'd repost how to make her famous-to-us egg noodles in hopes of inspiring some of you. Here in Indiana we eat them over a pile of mashed potatoes. Can you say carb overload?

Need some other inspiration in the kitchen? Head over to Friday's Recipe Swap.


Prep time: 15 minutes
Cooking time: approx 20-30 minutes
Serves: 10-12 (3 batches of noodles)
Cost: approx. $3.00


1 cup flour x 3($.75)
1 tsp salt x 3
milk
1 egg x 3 ($.25)
chicken or beef broth ($2.00)
Pepper to taste

Make each batch of noodles for this recipe individually. Mix together 1 cup flour and 1 tsp salt in a medium bowl. Make a "well" in the middle of the flour and crack 1 egg. Pour in 1/2 egg shell of milk and mix with a fork slowly working in the flour from the sides or the bowl.


Continue adding flour or small amounts of milk as needed until the dough is well formed and no longer sticky. Lightly knead the dough on a floured surface and form into a disk.


Roll out the disk until very thin and let the dough dry until air bubbles are noticeable on the surface.

Lightly flour top of dough and roll into a jelly roll. Slice noodles thinly and separate to dry. Allow to dry at least 1 hour.


Add noodles to rapidly boiling broth stirring constantly. When noodles become plump turn down heat to continue cooking. Add pepper to taste.


Cooking tips:
*Don't overuse the flour or the noodles will be bland. Use just enough to get rid of the sticky texture.
*Noodles can be completely dried before cooking.
*Chicken broth/beef broth left after roasting added to canned broth is optimal.
*It's better to use more broth rather than too little. The noodles will absorb quite a bit of liquid in cooking.
* Noodles can be stored in a bag and frozen. Just add frozen noodles to boiling broth.

Friday, October 23, 2009

Granola

I so am not a fan of grocery store cereal. It's so bad that my kids get cereal for their birthday and think it's the most special gift in the world. So recently I've been striving to keep homemade granola on hand for those who just can't stomach one more bowl of oatmeal. They like it so much, that I've had to put a measuring cup in the container. In reality, if we all ate this it would probably last us two days if we ate the right portion size. This stuff is packed full of good calories, but too much of a good thing in the end is not a good thing- if you know what I mean.

Homemade Granola


Prep Time: 15 minutes
Cook Time: 60 minutes
Servings: 24
Cost: Approx. $2.50

6 cups old fashioned oats ($.25)
1 cup oat bran cereal ($.75)
1/4 cup flax seeds ($.50)
1 tsp cinnamon
1/2 cup chopped almonds ($.75 if bought in bulk)
1/4 cup brown sugar
1/3 cup vegetable oil or unsweetened applesauce
1/4 cup honey ($.50)
1/2 cup water
1 tsp vanilla

Mix oats, bran, seeds, cinnamon, almonds and brown sugar. In a sauce pan combine oil/applesauce, honey water and vanilla over low heat until well incorporated. Pour liquid over dry ingredients and mix well.

Spread on cookie sheet or jelly roll pan. Bake at 300 for 60 minutes stirring every 15.

Let cool completely and store in air tight container.

Wednesday, October 21, 2009

Preserving: Roasted Pumpkin Seeds

Well, I couldn't let all those seeds go to waste, so roasting the seeds was the best option. Those two pumpkin produced 2 cups of seeds. Apart from getting them separated from the pulp, the rest was easy.

1 cup pumpkin seeds
1 Tbsp butter melted
salt to taste

Coat seeds well in butter and salt. Place on cookie sheet. Bake at 350 for 15-20 minutes stirring occasionally. Enjoy!

I got distracted so about half of ours burned. Next time I'll be more diligent. But according to Joseph, "The dark brown ones are the best!"

Note: 1 cup of seeds prepared this way is 1000 calories. Great snack if you are hiking in the wilderness. For the rest of us moderation is the key.